Now it is October; thoughts turn to autumn leaves and pumpkin pies--and how much work we can finish on our wagon before the first snow flies...
Since our last update, Siobhan and I have managed to complete at least a few projects on our wagon. ( Work would have progressed much faster if I had not contracted Rocky Mountain Spotted Fever early in the summer-- and if all the rain had not caused an abundance of weeds to give poor Siobhan the worst hay fever ever!). But after months of antibiotics, antihistamines, and decongestants, I think we're finally back on track...

On a recent trip to Lowes, we found a brass weather-stripping kit to go with our wagon's antique doorknob and hinges. We promptly bought it and installed it around the wagon door. (In addition to looking good, it will stop the door from rattling in its frame and keep the winter winds out!)

Siobhan also found a brass trunk lid support that was strong enough to hold up the door on the table storage compartment. (This was no small feat--the door is made from a 1.5" x 7" x 48" antique pediment, and is quite heavy. ) We had to install the lid support at an upward angle to get enough clearance, but it works great. It no longer requires both of us to remove the table!
The floor space is just enough to accommodate an air mattress for sleeping, and an antique wood pediment is nailed to the back wall as a headboard. With the built-in furniture now complete, we began working on the doors...
We framed in an 11" x 40" panel on both sides of the lower berth's doorway, and hung an overhead sliding door track. We hung two oak doors in the center. (The doors are wider than the end panels, and cover them completely when open.) We applied a 2nd coat of varnish to all the woodwork in the lower berth, and then moved on to the upper berth...

Siobhan and I quickly tired of climbing up and down the framework--so before we did anything else, we built a 5' x 18" sliding loft ladder for accessing the upper sleeping quarters. We used 1" oak lumber for the ladder itself, and reinforced the bottom of each stair tread with steel rods. We sprayed the rods with antique brass paint, and secured them on each end with brass nuts. We applied hidden felt pads to the bottom of the ladder's legs for ease in sliding, as well as to protect the floor. After Siobhan researched several nautical ladder designs, she decided that handrails would be a nice addition. Using concealed wood screws, we attached 4 antique hand-carved wood ram heads/legs to the ladder's front edge, placing 2 at the bottom and 2 at the top. The end result is pleasing to the eye, and quirky enough to satisfy both Siobhan and me....
Next we completed the 6 1/2' x 7 1/2' upper berth floor, using 1" x 6" x 8' tongue-and-groove lumber. (We pulled a string from the wagon front to back, to keep the floor square and the board edges true as we worked.) When everything was nailed down with oak panel nails, Siobhan stained the floor with 2 coats of Dark Walnut, topped with 2 coats of gloss varnish for a deep, rich finish. We fashioned a interior window screen for the upper berth's window, using an appropriate sized wooden picture frame and pet-proof mesh screening. We installed the screen with antique brass hinges at the top, and antique brass latches at the bottom. The look was quite nice, and Siobhan was pleased ...

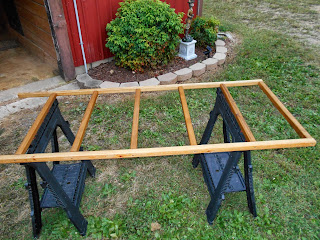
Now we are working on the right wall's middle panel. We built the frame from 2" x 2" x 8' treated lumber, and stained it with Minwax Golden Oak stain.

We then cut the siding boards needed to cover the framework from the inside. We painted the outside-facing surfaces with Olympic Oil Base Solid Color Stain (Winning Red). When the boards were dry, we carefully nailed them to the framework, pre-drilling nail holes as we worked.

Next we hand-painted and stenciled our floral pattern on each 12" section, using enamel craft paint. We turned the panel face-down to dry, and proceeded to paint the panel back (inside facing surface) with 2 coats of Tavern Green Milk Paint. We applied a coat of gloss polyurethane and left it to dry overnight. Tomorrow we will turn the panel face-up, and nail on wood appliques to each 2" rib. We will then apply 2 coats of spar urethane to all exterior surfaces, both stained and painted, and leave it to dry overnight. Friday we shall be ready to fasten the new panel in place, using star-drive lag bolts.
Over the weekend we will begin work on to the middle panel for the right side, using the same steps and same materials as we used on the left. As soon as both middle panels are completed and in place, we will update this post with additional photos.
Until then...
Baxt hai sastimos tiri patragi!
(Luck and Good Health!)


No comments:
Post a Comment