Now it is December...
Since last wagon update, Siobhan and I have finally completed the middle panel/left side, and secured it in place on the wagon. We purchased a tube of clear silicone caulking, and used it to seal between the upright middle panels (both left and right) and the horizontal interior ledges. We allowed the caulking to cure overnight, then we nailed down stained trim pieces over the caulking.
 |
| Wagon viewed from the right side, showing completed middle panel and partial framework for top panel. |
We then attached hand-carved trim pieces to the loft ladder, to add stability as well as for appearance. We finished installing the tread reinforcement rods beneath each step, and added slider feet to the bottom surface of the ladder legs (along with the felt pads applied earlier).
 |
| Loft ladder with reinforcement rods and carved trim. |
Siobhan and I put down wall-to-wall rugs in the main room, as well as in both sleeping berths, to protect the floors; we used carpet tape to hold the rugs securely in place. We stained and nailed down the baseboards to each side of the entry door, as well as the vertical trim pieces from floor to ledge.
 |
| Rugs in main room; view of pull-out table and loft ladder in background |
 |
| Rugs in upper sleeping berth. |
A flurry of snow flakes fell on Nov. 11... But the following week, temperatures reached 70 degrees on several days, and we worked like mad on the wagon. Since paint will not cure well in colder temperatures, Siobhan and I decided to take advantage of each warm day, using it to paint any wood that we might need in the next few weeks. Then on days that are too cold to paint, we can saw and hammer. At least, that is the latest plan!
We have now stained enough 2" x 2" lumber to build the remaining two panel frames (top side panel/left and top side panel/right); we have painted enough siding boards (interior and exterior surfaces) to cover each panel. On our last trip to Lowes, we purchased enough 2 1/2" wood screws and 1" panel nails to assemble both panels.
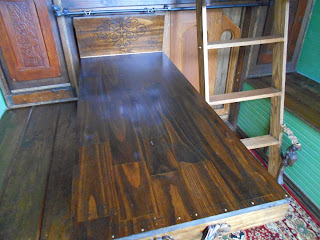
While we were staining and painting, we applied an extra coat of polyurethane to our pull-out dining table, and added an extra bracket to the rod the table hooks onto-- just for additional support.
 |
| Concealed door for pull-out dining table; concealed brass piano hinge and door support. |
 |
| Pull-out dining table, 2' x 4' |
 |
| Hand-painted design on table top. |
 |
| Hinged folding legs with locking mechanism; brass casters on each foot |
 |
| Hand-carved oak handle on front end of table, for easy removal from storage compartment. |
Siobhan and I have finished building and staining the framework for the last 14' panel on the right side (the top right panel ). A 6'4" section of the 14' framework will serve as the upper berth's right wall; this section is now secured in place. The siding boards for this section are ready to install-- both sides painted and sealed with polyurethane. With a little luck, we can nail up this wall tomorrow. Once the 6'4" section is complete, we can attach and secure the 8' section of framework, then nail on the remaining siding boards to complete this panel.
**At this point, the window opening in the 8' section will only be roughed in. When the remaining panel (top left) is built--mirroring the right--and secured, then we will hang the two windows, (using brass awning hinges), and build the window frames and screens. Then we will build the concealed tracks and hang the exterior sliding shutters.
 |
| Antique stained glass window purchased for top right panel of wagon; still partially wrapped in plastic and surrounded by pink foam... |
How our work will progress in the next few weeks is anybody's guess...So much depends on the weather (which is always unpredictable). And Christmas is just around the corner (our favorite time of the year!) And then there is New Year's Eve. Hmmm... Maybe I'd better get back to work!
Until next post...
Hekta!
(Make haste!)
No comments:
Post a Comment